Create your first game
In this step-by-step guide, we’ll see how you can create your first game using Vectarine. This will be a PONG game, where you control a paddle to bounce a ball and try to score against an AI opponent.
This guide is made for beginners and doesn’t go into the details of Vectarine. If you are already familiar with programming and game development, you can take a guided tour of Vectarine to see how to use the different features of the engine.
Installation
Section titled “Installation”To install Vectarine, you can run the following command in a terminal depending on your platform
You need to use powershell, not cmd.exe
irm https://vectarine.surge.sh/install_nt.sh | iex
curl -fsSL https://vectarine.surge.sh/install_linux.sh | sh
curl -fsSL https://vectarine.surge.sh/install_mac.sh | sh
Alternatively, if you prefer, you can download Vectarine from Github. In that case, you need to download the zip file for your platform.
You can unzip it anywhere you like and run VectarineEditor executable to get started.
You can press Create a new project to select the location where you want to create your project.
Once you created your project, you will see a black screen with the vectarine logo and the text “Empty Game”.
This is normal, as no code has been written yet. You can open the resources tab from the tools menu or with Ctrl+2 to see the files of your project.
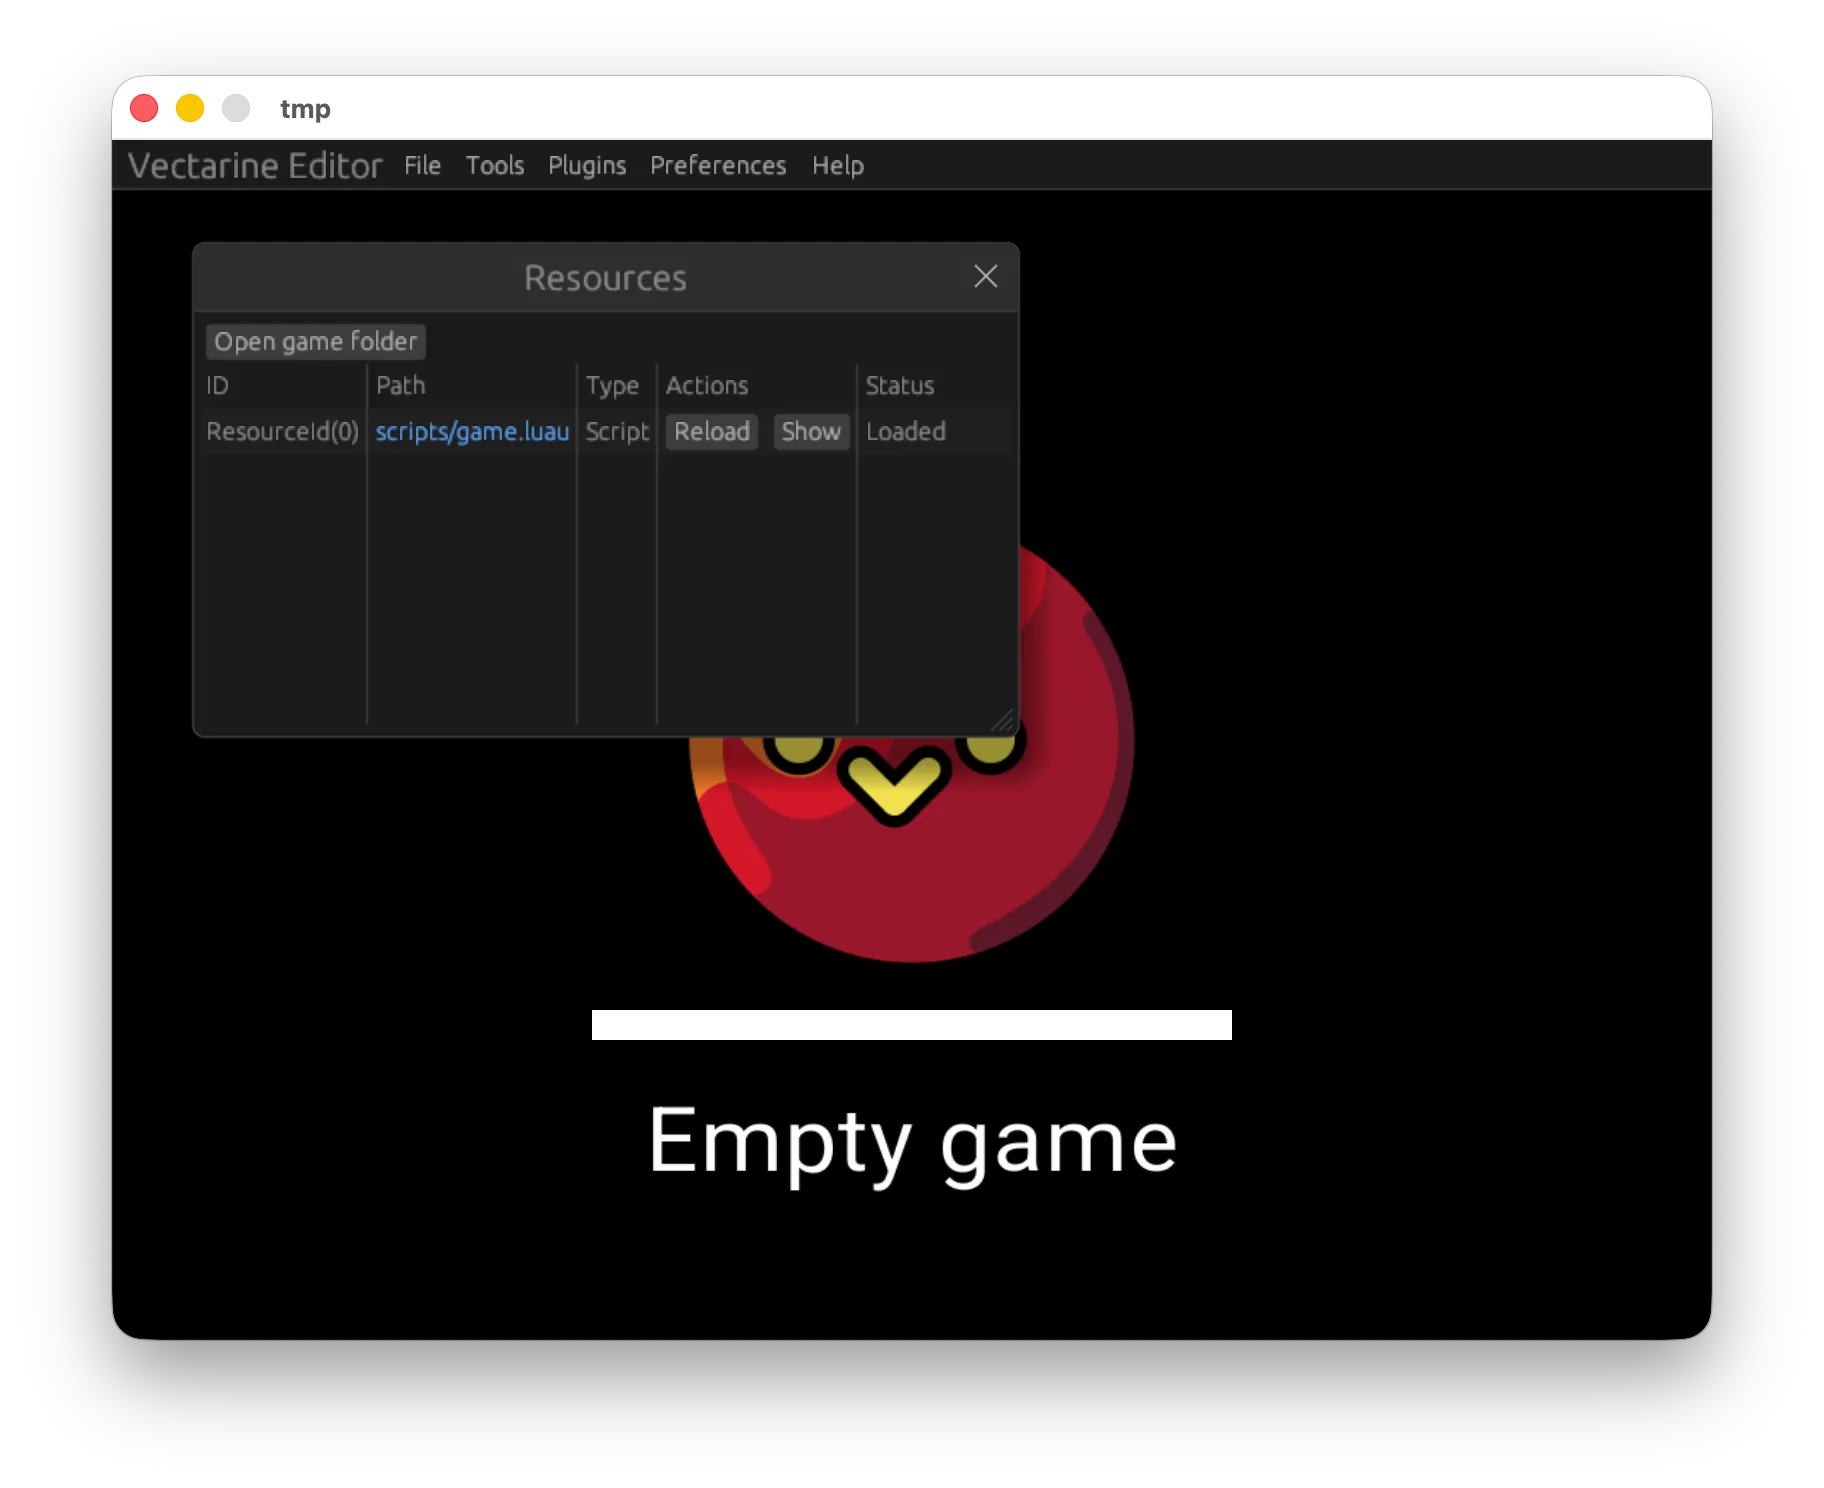
Your game has only one resource, the main script, scripts/game.luau. game.luau is the first file loaded by any Vectarine game. Its job is to set up the game
and load all of the other files needed.
You can press on the blue link to open the script in your default luau editor. You can also open the game folder to open the .luau file manually.
An empty game script looks like this:
local Debug = require('@vectarine/debug')
local Graphics = require('@vectarine/graphics')
local Vec4 = require('@vectarine/vec4')
local Vec = require('@vectarine/vec')
Debug.print("Loaded.")
function Update(deltaTime: number)
    Graphics.clear(Vec4.WHITE)
    Graphics.drawSplashScreen("Empty game", 0.0)
    Debug.fprint("Rendered in ", deltaTime, "sec")
end
Before explaining what all the code does, try to replace “Empty game” with “Hello Vectarine!” and save the file. You should see the change in the editor immediately without needing to restart the game.
Editing Luau code
Section titled “Editing Luau code”You can use any text or code editor to edit .luau files, but for the best experience, I recommend using Visual Studio Code with
the following extensions:
Luau Language Server: Provides autocompletion, type checking and error highlighting for Luau code. This is a must have as it shows you available functions and their documentation as you type.
StyLua: A code formatter for Luau. It automatically formats your code when you save the file, making it more readable and consistent. This is less important than Luau Language Server, but it can be nice to have.
If both extensions are installed, your code should be colored, errors should be highlighted, and you should see function suggestions when you type a dot after a module name:
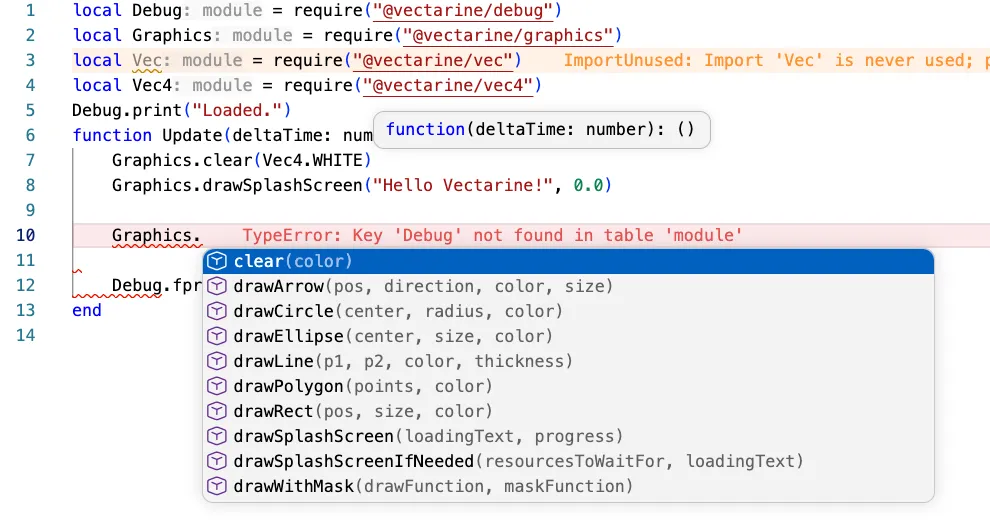
Pressing Ctrl while clicking on a Vectarine function should take you to its definition with documentation. Hovering over a function should also show you its documentation and parameters.
The basics
Section titled “The basics”Vectarine uses Luau for scripting. Luau is a programming language that is great for beginners as it is easy to learn.
When your game is first loaded, the game.luau file is executed. Files ending with .luau contain Luau code that is executed to make your game work.
Code is read top to bottom and every line contains something for the computer to do, like a cooking recipe.
Code is organized into functions. Functions are reusable pieces of code that do useful things.
function functionName()

	put content of the function here

end
You can call a function to run it by writing its name followed by parenthesis:
functionName()
This will run the content of functionName. While you can write and call you own functions, Vectarine and Luau have a lot of functions to do all kinds of things useful for making games like drawing to the screen, playing sound, etc.
A simple example is the math.abs function which removes the sign of a number so math.abs(-3) is 3 and math.abs(1.2) is 1.2.
Inside code, you can add explanations that do nothing for the computer but are useful for you to understand and remember what the code does.
These explanation are preceded by -- and are called comments. You can write anything you want in comments, and they will be ignored by the computer.
-- Hello, I'm explaining the code below.
As this is a tutorial, I will use a lot of comments to explain what is going on all of the time.
The Update function is then called every frame. This is where you put the code that needs to be executed continuously, like drawing your game.
Code outside of the Update function is executed once at the start of the game and can be used to initialize things.
When you save, Vectarine will reexecute your game.luau file to provide hot-reload.
function Update(deltaTime: number)
	-- This code is executed every frame
end
deltaTime is the time in seconds since the last frame. You can use it to make objects move at a consistent speed regardless of how fast the code is executed.
Drawing to the screen
Section titled “Drawing to the screen”Modules are packages of related functions. To get access to a module, you need to import it using the require function, like so:
local myModule = require("moduleName")
-- To execute a function, you need to put parenthesis after its name.
-- Inside these parenthesis, you can sometimes put arguments to give the function more information to do its job.
myModule.functionInsideModule()
myModule.functionWithArguments(1, 4, 5)
Vectarine has many modules to do many things. The first modules we’ll see are the Graphics, Vec and Vec4 modules.
Graphicsprovides function to draw on the screen.Vecprovides 2d vector types and function to do math with them.Vec4provides a 4d vector type that is used to represent colors.
As the screen is 2D, a lot of Graphics function take Vec2 as parameters to represent screen locations.
An aside on variables
Section titled “An aside on variables”You can make a vector using the Vec2.V2 function like so:
-- Import the Vec module to get access to the Vec2 type
local Vec = require("@vectarine/vec")

-- Use the Vec.V2 function to create a vector with x = 1 and y = 2, and put it in a variable named v
local v = Vec.V2(1, 2)
There we use the local keyword to create a variable named v that contains the vector (1, 2). Variables are like boxes that contain values.
-- var contains the value 3
local var = 3
-- name contains the value "Joe"
local name = "Joe"

-- var2 contains the value 5 because it is the result of adding 2 to 3.
local var2 = var + 2
-- You can modify the content of a variable by assigning it a new value like so:
-- Now var contains the value 4 because we added 1 to it.
var = var + 1
When requiring a module, we put it into a variable to use all of its functions later which is why we also use the local keyword there.
Colors are represented as Vec4 because they are made of a mix of red, green, blue and alpha (opacity).
The Vec4 module contains a few default colors like Vec4.WHITE and Vec4.RED but you can also create your own colors with Vec4.createColor(r, g, b, a) where r, g, b and a are numbers between 0 and 1.
You can import a module using require:
-- Import the Graphics and Vec modules
local Graphics = require("@vectarine/graphics")
local Vec = require("@vectarine/vec")
local Vec4 = require('@vectarine/vec4')

function Update(deltaTime: number)
	-- Set the background color to white using the clear function
	Graphics.clear(Vec4.WHITE)

	-- Draw a red circle at the center of the screen (0,0) with a radius of 0.5 units (2 units is the width of the screen)
	Graphics.drawCircle(Vec.V2(0, 0), 0.5, Vec4.RED)

	local rectColor = Vec4.createColor(0, 0, 1, 1) -- Create a blue color
	-- Draw a blue rectangle at the bottom right of the screen
	Graphics.drawRect(V2(0.7, -1), V2(0.3, 0.3), rectColor)
end
When using Vectors:
(0,0)is the center of the screen.(-1,-1)is the bottom left of the screen.(-1,1)is the top left of the screen.(1,-1)is the bottom right of the screen.(1,1)is the top right of the screen.
The screen is 2x2 units.
Displaying a value to debug
Section titled “Displaying a value to debug”Sometimes, you have a variable, but you don’t know its content:
local score = mysteryFunction()
To understand your program, it is useful to know the content of your variable. To do so, you can use the Debug module to print the content of your variable to the console:
local Debug = require("@vectarine/debug")

local score = mysteryFunction()
Debug.print("The score is: ", score)
Debug will display the content of the variable in the console, which you can open from the tools menu or with Ctrl+1.
If you display something inside the Update function, it will be displayed every frame, which can be a lot of values and flood the console.
To avoid this, you can use Debug.fprint (like frame print), which prints the value, but overwrite the previous value displayed by Debug.fprint which
allows you to see values that change every frame.
Global values and the watcher
Section titled “Global values and the watcher”You can create variables without using the local keyword. These variables are called global and can be accessed from any file in your project.
You can see the content of a global variable in the watcher tool, which you can open from the tools menu or with Ctrl+3.
You can search the variable to watch-for by name in the search bar and its value will be shown and updated in real-time.
Reading input from the player
Section titled “Reading input from the player”We’d like to react to player input to make our game interactive. The Io module provides functions to read input from the player.
local Io = require("@vectarine/io")
local Graphics = require("@vectarine/graphics")
local Vec4 = require("@vectarine/vec4")
local Vec = require("@vectarine/vec")

function Update(deltaTime: number)
	Graphics.clear(Vec4.WHITE)

	-- Depending on if space is pressed, we draw a red or blue circle at the center of the screen
	if Io.isKeyDown("Space") then
		Graphics.drawCircle(Vec.V2(0, 0), 0.5, Vec4.RED)
	else
		Graphics.drawCircle(Vec.V2(0, 0), 0.5, Vec4.BLUE)
	end
end
Let’s make this game!
Section titled “Let’s make this game!”With these 2 concepts: drawing on the screen and reading player input, we have everything we need to make a simple pong game!
We start by drawing a ball at the center of the screen.
We store the position and velocity of the ball in a variable named Ball.
We can access and update the position using Ball.position and the velocity using Ball.velocity.
For now, we only use the position to draw the ball, but we will use the velocity later to move the ball.
local Debug = require("@vectarine/debug")
local Graphics = require("@vectarine/graphics")
local Vec4 = require("@vectarine/vec4")
local Vec = require("@vectarine/vec")

-- Initialize a ball variable with a position at the center of the screen and a velocity pointing to the top right.
local Ball = {
  position = Vec.V2(0, 0),
  velocity = Vec.V2(1, 1.5),
}

function Update(deltaTime: number)
  Graphics.clear(Vec4.WHITE)
  Graphics.drawCircle(Ball.position, 0.1, Vec4.RED)
end
To move the ball, we change its position every frame by adding the velocity to it.
To avoid having the ball go off the screen, when its position is too high (bigger than 1 or smaller than -1), we change the velocity to make it go in the opposite direction.
You might notice that we don’t write Ball.position += Ball.velocity, but we scale it by deltaTime.
With no scaling, it means that a game running at 60 fps would move the ball faster than a game running at 30 fps, so the gameplay would change a lot depending on the hardware. We
don’t want that! So we multiply by deltaTime so that the movement is proportional to the time elapsed since the last frame.
local Debug = require("@vectarine/debug")
local Graphics = require("@vectarine/graphics")
local Vec4 = require("@vectarine/vec4")
local Vec = require("@vectarine/vec")

local Ball = {
	position = Vec.V2(0, 0),
	velocity = Vec.V2(1, 1.5),
}

function Update(deltaTime: number)
	Graphics.clear(Vec4.WHITE)
	Graphics.drawCircle(Ball.position, 0.1, Vec4.RED)

	-- By adding the velocity to the position every frame, the ball will move in the direction of the velocity.
	Ball.position += Ball.velocity:scale(deltaTime)

	-- We change the velocity when the ball hits the border of the screen to make it turn around.
	-- Every if is a condition representing a border of the screen.
	if Ball.position.y < -1 then
		-- The math.abs function returns the absolute value of a number, (the number without its sign)
		Ball.velocity.y = math.abs(Ball.velocity.y)
	end
	if Ball.position.y > 1 then
		Ball.velocity.y = -math.abs(Ball.velocity.y)
	end

	if Ball.position.x < -1 then
		Ball.velocity.x = math.abs(Ball.velocity.x)
	end
	if Ball.position.x > 1 then
		Ball.velocity.x = -math.abs(Ball.velocity.x)
	end
end
When saving, Vectarine re-executes game.luau, which runs your initialization code and resets all variables, including the position of the ball.
To preserve the ball between saves, we can use the Persist module to store the ball position and velocity in a way that survives reloads.
Persisted values are made global and can be inspected with the watcher tool.
local Persist = require("@vectarine/persist")

-- You can wrap any variable initialization with Persist.onReload to make it persist between reloads.
local Ball = Persist.onReload({
	position = Vec.V2(0, 0),
	velocity = Vec.V2(1, 1.5),
}, "ball")

--- The rest is unchanged
local Graphics = require("@vectarine/graphics")
local Vec4 = require("@vectarine/vec4")
local Vec = require("@vectarine/vec")
local Io = require("@vectarine/io")
local Persist = require("@vectarine/persist")

local Ball = Persist.onReload({
	position = Vec.V2(0, 0),
	velocity = Vec.V2(1, 1.5),
}, "ball")

local Player = Persist.onReload({
	position = 0,
}, "Player")

local racketSize = 0.4

function Update(deltaTime: number)
	Graphics.clear(Vec4.WHITE)
	-- Drawing
	Graphics.drawCircle(Ball.position, 0.1, Vec4.RED)
	Graphics.drawRect(Vec.V2(-0.9, Player.position), Vec.V2(0.1, racketSize))

	-- Player input
	if Io.isKeyDown("Up") then
		Player.position += deltaTime
	end
	if Io.isKeyDown("Down") then
		Player.position -= deltaTime
	end

	-- Ball code stays the same
end
local Graphics = require("@vectarine/graphics")
local Vec4 = require("@vectarine/vec4")
local Vec = require("@vectarine/vec")
local Io = require("@vectarine/io")
local Persist = require("@vectarine/persist")

local Ball = Persist.onReload({
	position = Vec.V2(0, 0),
	velocity = Vec.V2(1, 1.5),
}, "ball")

local Player = Persist.onReload({
	position = 0,
}, "player")

local Opponent = Persist.onReload({
	position = 0,
}, "opponent")

local racketSize = 0.4

function Update(deltaTime: number)
	Graphics.clear(Vec4.WHITE)
	-- Drawing
	Graphics.drawCircle(Ball.position, 0.1, Vec4.RED)
	Graphics.drawRect(Vec.V2(-0.9, Player.position), Vec.V2(0.1, racketSize))
	Graphics.drawRect(Vec.V2(0.8, Opponent.position), Vec.V2(0.1, racketSize))

	-- Player input stays the same

	-- Opponent movement
	if Ball.position.y < Opponent.position + racketSize / 2 then
		Opponent.position -= deltaTime / 1.1
	end
	if Ball.position.y > Opponent.position + racketSize / 2 then
		Opponent.position += deltaTime / 1.1
	end

	-- Ball code stays the same
end
local Graphics = require("@vectarine/graphics")
local Vec4 = require("@vectarine/vec4")
local Vec = require("@vectarine/vec")
local Io = require("@vectarine/io")
local Persist = require("@vectarine/persist")

local Player = Persist.onReload({
	position = 0,
	score = 0,
}, "player")

local Opponent = Persist.onReload({
	position = 0,
	score = 0,
}, "opponent")

-- Ball initialization code stays the same

function resetBall()
	Ball.position = Vec.V2(0, 0)
	Ball.velocity.y = math.random() * 2
end

function Update(deltaTime: number)
	Graphics.clear(Vec4.WHITE)
	-- Drawing
	Graphics.drawCircle(Ball.position, 0.1, Vec4.RED)
	Graphics.drawRect(Vec.V2(-0.9, Player.position), Vec.V2(0.1, racketSize))
	Graphics.drawRect(Vec.V2(0.8, Opponent.position), Vec.V2(0.1, racketSize))

	-- Player input stays the same

	-- Opponent movement stays the same

	-- Physics
	Ball.position += Ball.velocity:scale(deltaTime)
	if Ball.position.y < -1 then
		Ball.velocity.y = math.abs(Ball.velocity.y)
	end
	if Ball.position.y > 1 then
		Ball.velocity.y = -math.abs(Ball.velocity.y)
	end

	if Ball.position.x < -1 then
		Opponent.score += 1
		resetBall()
	elseif Ball.position.x < -0.8 then
		if Ball.position.y > Player.position and Ball.position.y < Player.position + racketSize then
			Ball.velocity.x = math.abs(Ball.velocity.x)
		end
	end

	if Ball.position.x > 1 then
		Player.score += 1
		resetBall()
	elseif Ball.position.x > 0.8 then
		if Ball.position.y > Opponent.position and Ball.position.y < Opponent.position + racketSize then
			Ball.velocity.x = -math.abs(Ball.velocity.x)
		end
	end
end
We can use the math.random() function to obtain a random number between 0 and 1. We use it to make the game more interesting.
local Graphics = require("@vectarine/graphics")
local Vec4 = require("@vectarine/vec4")
local Vec = require("@vectarine/vec")
local Io = require("@vectarine/io")
local Persist = require("@vectarine/persist")
local Text = require("@vectarine/text")

local Ball = Persist.onReload({
	position = Vec.V2(0, 0),
	velocity = Vec.V2(1, 1.5),
}, "ball")

local Player = Persist.onReload({
	position = 0,
	score = 0,
}, "player")

local Opponent = Persist.onReload({
	position = 0,
	score = 0,
}, "opponent")

local racketSize = 0.4

function resetBall()
	Ball.position = Vec.V2(0, 0)
	Ball.velocity.y = math.random() * 2
end

function Update(deltaTime: number)
	Graphics.clear(Vec4.WHITE)
	-- Drawing
	Graphics.drawCircle(Ball.position, 0.1, Vec4.RED)
	Graphics.drawRect(Vec.V2(-0.9, Player.position), Vec.V2(0.1, racketSize))
	Graphics.drawRect(Vec.V2(0.8, Opponent.position), Vec.V2(0.1, racketSize))

	local scoreText = Player.score .. " - " .. Opponent.score
	local measurements = Text.font:measureText(scoreText, 0.2)
	Text.font:drawText(scoreText, Vec.V2(-measurements.width / 2, 0), 0.2)

	-- Player input stays the same

	-- Opponent movement stays the same

	-- Physics
	Ball.position += Ball.velocity:scale(deltaTime)
	if Ball.position.y < -1 then
		Ball.velocity.y = math.abs(Ball.velocity.y)
	end
	if Ball.position.y > 1 then
		Ball.velocity.y = -math.abs(Ball.velocity.y)
	end

	if Ball.position.x < -1 then
		Opponent.score += 1 -- <-- Increment opponent score when the ball goes out on the left
		resetBall()
	elseif Ball.position.x < -0.8 then
		if Ball.position.y > Player.position and Ball.position.y < Player.position + racketSize then
			Ball.velocity.x = math.abs(Ball.velocity.x)
			Ball.velocity.y = 2 * math.random()
		end
	end

	if Ball.position.x > 1 then
		Player.score += 1 -- <-- Increment player score when the ball goes out on the right
		resetBall()
	elseif Ball.position.x > 0.8 then
		if Ball.position.y > Opponent.position and Ball.position.y < Opponent.position + racketSize then
			Ball.velocity.x = -math.abs(Ball.velocity.x)
			Ball.velocity.y = 2 * math.random()
		end
	end
end
Final version
Section titled “Final version”In the end, the code looks like this:
local Graphics = require("@vectarine/graphics")
local Vec4 = require("@vectarine/vec4")
local Vec = require("@vectarine/vec")
local Io = require("@vectarine/io")
local Persist = require("@vectarine/persist")
local Text = require("@vectarine/text")

local Ball = Persist.onReload({
	position = Vec.V2(0, 0),
	velocity = Vec.V2(1, 1.5),
}, "ball")

local Player = Persist.onReload({
	position = 0,
	score = 0,
}, "player")

local Opponent = Persist.onReload({
	position = 0,
	score = 0,
}, "opponent")

local racketSize = 0.4

function resetBall()
	Ball.position = Vec.V2(0, 0)
	Ball.velocity.y = math.random() * 2
end

function Update(deltaTime: number)
	Graphics.clear(Vec4.WHITE)
	-- Drawing
	Graphics.drawCircle(Ball.position, 0.1, Vec4.RED)
	Graphics.drawRect(Vec.V2(-0.9, Player.position), Vec.V2(0.1, racketSize))
	Graphics.drawRect(Vec.V2(0.8, Opponent.position), Vec.V2(0.1, racketSize))

	local scoreText = Player.score .. " - " .. Opponent.score
	local measurements = Text.font:measureText(scoreText, 0.2)
	Text.font:drawText(scoreText, Vec.V2(-measurements.width / 2, 0), 0.2)

	-- Player input
	if Io.isKeyDown("Up") then
		Player.position += deltaTime
	end
	if Io.isKeyDown("Down") then
		Player.position -= deltaTime
	end

	-- Opponent movement
	if Ball.position.y < Opponent.position + racketSize / 2 then
		Opponent.position -= deltaTime / 1.1
	end
	if Ball.position.y > Opponent.position + racketSize / 2 then
		Opponent.position += deltaTime / 1.1
	end

	-- Physics
	Ball.position += Ball.velocity:scale(deltaTime)
	if Ball.position.y < -1 then
		Ball.velocity.y = math.abs(Ball.velocity.y)
	end
	if Ball.position.y > 1 then
		Ball.velocity.y = -math.abs(Ball.velocity.y)
	end

	if Ball.position.x < -1 then
		Opponent.score += 1
		resetBall()
	elseif Ball.position.x < -0.8 then
		if Ball.position.y > Player.position and Ball.position.y < Player.position + racketSize then
			Ball.velocity.x = math.abs(Ball.velocity.x)
			Ball.velocity.y = 2 * math.random()
		end
	end

	if Ball.position.x > 1 then
		Player.score += 1
		resetBall()
	elseif Ball.position.x > 0.8 then
		if Ball.position.y > Opponent.position and Ball.position.y < Opponent.position + racketSize then
			Ball.velocity.x = -math.abs(Ball.velocity.x)
			Ball.velocity.y = 2 * math.random()
		end
	end
end
You now have a fully functional pong game! Congrats!
What’s next?
Section titled “What’s next?”Now that you know the basics of Vectarine, you can check the guided tour to see how to use the different features of the engine including playing sounds, the displaying images, using the physics engine, and much more! You can try to expand on this game by adding sound effects, power-ups, etc. or create a new game from scratch!
You can also check the luau-api folder of your project which has all the available functions of Vectarine with documentation and examples on how to use them.